Start Your Free Trial of Photoshop:
I Guarantee I Can Teach You to Master Photoshop. Learn How:
I Guarantee I Can Teach You to Master Photoshop. Learn How:
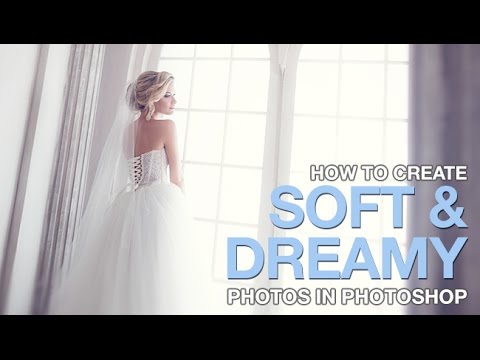
How to Create Soft & Dreamy Photos in Photoshop
Take photos to the next level by adding a soft and dreamy look – perfect for weddings, engagements and family photos.
Use Iris Blur to Draw More Attention to the Subject
The soft and dreamy look is done by adding a slight blur to the edges of a photo and adding a soft blur to the light in an image.
To add a slight blur to the edges of a photo, first start by duplicating the background layer and converting it into a smart object by right-clicking on the thumbnail and selecting ‘Convert to Smart Object.”
After converting the layer into a smart object, go to ‘Filter – Blur Gallery – Iris Blur’. In this dialog, you can choose how much blur you would like applied by sliding the blur slider on the right. The controls in the center of the screen allow movement of the blur center, the shape of the blur and feathering.
Choose a subtle blur around the edges of the photo for the soft dreamy look.
How to Make Light Soft & Dreamy
After applying an Iris Blur to the photo, it is time to blur the light only. To begin, create a selection out of the light in the photo by going to ‘Select – Color Range’ and clicking on the light source with the eyedropper tool.
The preview will be white in selected areas and black in non-selected areas. Be sure to adjust the slider to just include the light in the selection.
After turning this area into a selection, create a new layer and either fill it with white or duplicate the selected area from the background. The goal here is to have just the light from the photocopied onto a new layer.
Next, convert the layer with just the light into a Smart Object by right-clicking on it and going to ‘Convert to Smart Object’. We want it to be a smart object so that we can use ‘Smart Filters’. Smart Filters can be changed at any time, making them more versatile than regular filters.
After converting into a Smart Object, apply a blur by going to ‘Filter – Blur – Gaussian Blur’ and choose a radius to expand the light. Adjust the opacity of the layer to suit the image and duplicate it if more of the effect is necessary.
How to Color Tone for the Soft & Dreamy Look
Once the background has been blurred using an Iris Blur and the light has been blurred using a Gaussian Blur, it is time to color tone the image.
In this example, we use a Levels Adjustment layer and edit the Blur Channel – adding more blue to the shadows and yellow to the highlights.
Feel free to play around with color, each photo is different and requires color toning unique to that photo. Most of all, have fun!
VISIT PHLEARN.COM FOR MORE FREE TUTORIALS
SUBSCRIBE TO OUR CHANNEL FOR MORE FREE TIPS AND TRICKS
GET FREE TUTORIALS IN YOUR EMAIL + DISCOUNTS ON OUR PRO TUTORIALS!
BUY THE TABLET AARON USES!
LET’S BE FRIENDS!
Instagram ►
Facebook ►
Twitter ►
Google+ ►
Phlearn ►
Did you know there is a lot more to PHLEARN than YouTube?
-~-~~-~~~-~~-~-
-~-~~-~~~-~~-~-
Your tutorials are so thorough, clear and easy to follow. Thank you!!!
thank you for this awesome video.
This is probably silly, but under Select, I do not have "colour range"
Im using Adobe Photoshop elements 18. What am I missing??
I can't choose Irish blur in my options. It's just gray and non-clickable 🙁
this is one of the few videos in youtube that has less than 1% dislike! thumbs up for quick and great tutorial! Thanks
What tablet are you using? Also when you say you can "duplicate" instead of filling with white how does one go about that?
In CS6 smart filters grey out the iris blur. :/
I have the same problem as a girl below 'could not complete the Gaussian blur command because the selected area is empty' how did you fix it ?
Finally! Someone who actually talks in his videos and doesn't use instrumental tutorials. Smart 🙂
I used this techniques on #PSAM #USAF exhibit plane. Used some Raw and clarity, then really added some nice touches with RG levels.
Your presentation was so clear and easy to follow. In fact, I'm going to subscribe to your site and follow up on other tutorials. Thank you!!
You said "I am going to hit this check box" That's when I lost you. What check box? I love your stuff but it's such a pity when you do that.
thank you for your wonderful tutorial !!!!
Won't work for me-on CS6 and when I convert the image to smart object the iris blur filter is greyed out 🙁
Every time I turn my image into a smart object, many of the features stop working. Iris blur does not work on a smart object. What do I do?
Muchas gracias!
hahaha funny ending thanks i learned a lot
Did you sharpen the photo first before doing this?
This was helpful! thank you!
Hi. Its very nice, good job. Can you give me this no effect image hd? I want paractice on this img 🙂
Oops … levels
you are amazing
Thanks Aaron! Great video!
Simply great! thx for all the details, helped a lot! cheers
Very educational! Thank you for this tip! <3
Theres no Blur Gallery in my PS :(((( HEEELP
I LOVE YOU..FROM PHILIPPINES..
one of the best tutorials i had ever seen, thank you man!
I really love the tutorial, excelent teacher!!! THANK YOU so much for this tutorial <3
Thanks for your tutorials, as many here I am starting learning photoshop, is overwelming, but you make everything so easy .. in this tutorial I got stuck at the color range after selected the color when i click shift delete it tells me that the layer is empty…
Your the MAN!
Good One
We looove your videos! Keep up the great work! 🙂
wow i like this soft
Very nice …….pleaseplease reply me
I just love you you are so much help
love your tutorials
You Have Changed My Work Life..!!!! And I Thank You..!!!
Love it
Who else loves Smart Objects!
Since I started my editing journey I remember once I was searching all around the internet for this color tone action 😛 haha I really was madly in love with this filter now I am able to do it by my self, Thank you Aron !
amazing tutorial 🙂 thx i used this in AE it works fine with videos too!!
Amazing! Defenitly subscribing! Wonderfull job!