Get the latest version of Photoshop here:
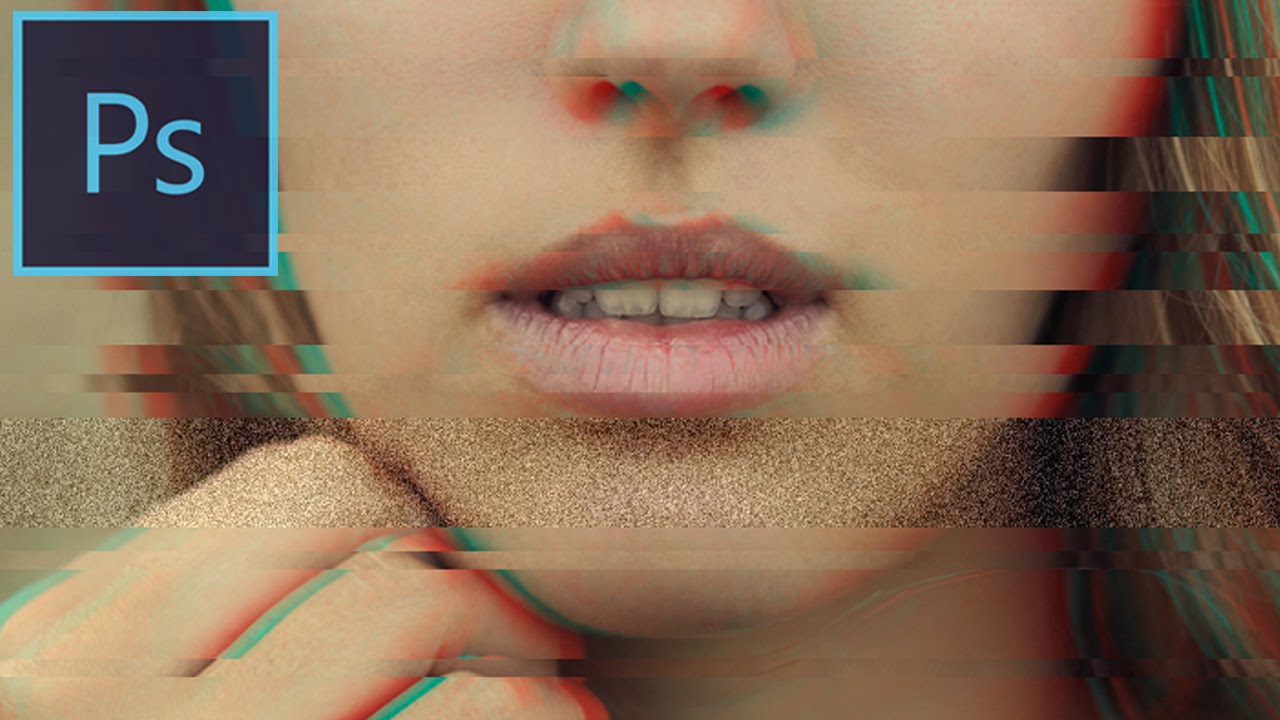
In this tutorial, I will be using Photoshop CC to demonstrate how to create a sliced glitch art style photo effect in Photoshop.
Previous Glitch Art Tutorials:
VCR EFFECT:
COLOR CHANNEL SPLITTING:
————————————————————–
SUBSCRIBE on Youtube for new videos!
–
FOLLOW ME ON SOCIAL MEDIA
– Instagram:
– Twitter:
– Facebook:
VISIT MY WEBSITE
–
—(F.A.Q.) Frequently Asked Questions—
Where to get Photoshop, Lightroom, Premiere Pro etc. ?
➜ Get Adobe Creative Cloud:
All of the Tech & Camera Gear I Use:
➜ List of My Gear:
Thanks for watching!
(Affiliates: Adobe, Amazon)
I followed this guide, about 1 or 2 inconsistancies that my laptop couldn't do but yours could. Overall result- Got exactly what I wanted in the end. Great guide!! 😀
Thank you bro! Good stuff!
Will this work with CS6? I have tried with no luck
For whatever reason, I cannot get my filters to allow me to Distort–>Shear. Once I select the Red Channel the Filters panel becomes disabled. I'm working in 8bit/channel. I can select Distort–>Shear when I make no adjustmenet to the channels portion.
Anybody know if I'm missing something?
Does this work on gimp?
You're an amazing teacher and so talented. Thank you!
your tutorials are awesome!
Ridiculous that photoshop doesn't have a fucking glitch filter. This is so tedious and the end result isn't even that convincing.
Great tutorial! It also helps that he is hot.
Dope Bro…It Helped Out Alot!
Great tutorial!
Thanks, Justin
I just got Photoshop CC 2017 yesterday and I've forgotten some of my skill that I had acquired from my Graphic Design course from last year. Ill defiantly be watching your videos again because your extreamly helpfull.
I don't why I keep watching this stuff I don't even have photoshop
Awesome video! But I'm kinda lost: when I right click after making the rectangles ( 2:40 in the video) , the "fill" option is not available…
This is really confusing and I'm only beginning to get to advanced photo editing,or do I just not know how easy it is until I've done it ?
Thanks a lot for this!!!!
This is an amazing tutorial thank you so much!!
i'm on a pc and when i try to put a filter on the color channels it won't let me, any idea anyone??
I am obsessed with your channel. keep up the good work!!! thanks!!!!
thank you!
I need help bad, when I go to Channels to create the Glitch effect I click Red then go to Filters but everything is Grey and wont allow me to click Distort.
Thank you!!!!! 🙂 I have been looking for a distortion video!
thank you!
fantastic!
I'm tryna pay someone to edit videos if you got the sauce then drop your email.
Got exactly the effect i wanted, great tutorial!
great vid damn!
You are a beautiful man 🙂
Wow this was really helpful and informative, not like some tutorials that just fast forward through how to do things. I was wondering if there was a way that one could "glitch" and image such as the way you did here but have another image appear within the glitches? I'm trying to do an art piece and I think that would be a cool idea.
You're Awesome !
This was an absolutely fantastic and well explained tutorial. Thanks for sharing it with us, man!