I Guarantee I Can Teach You to Master Photoshop. Learn How:
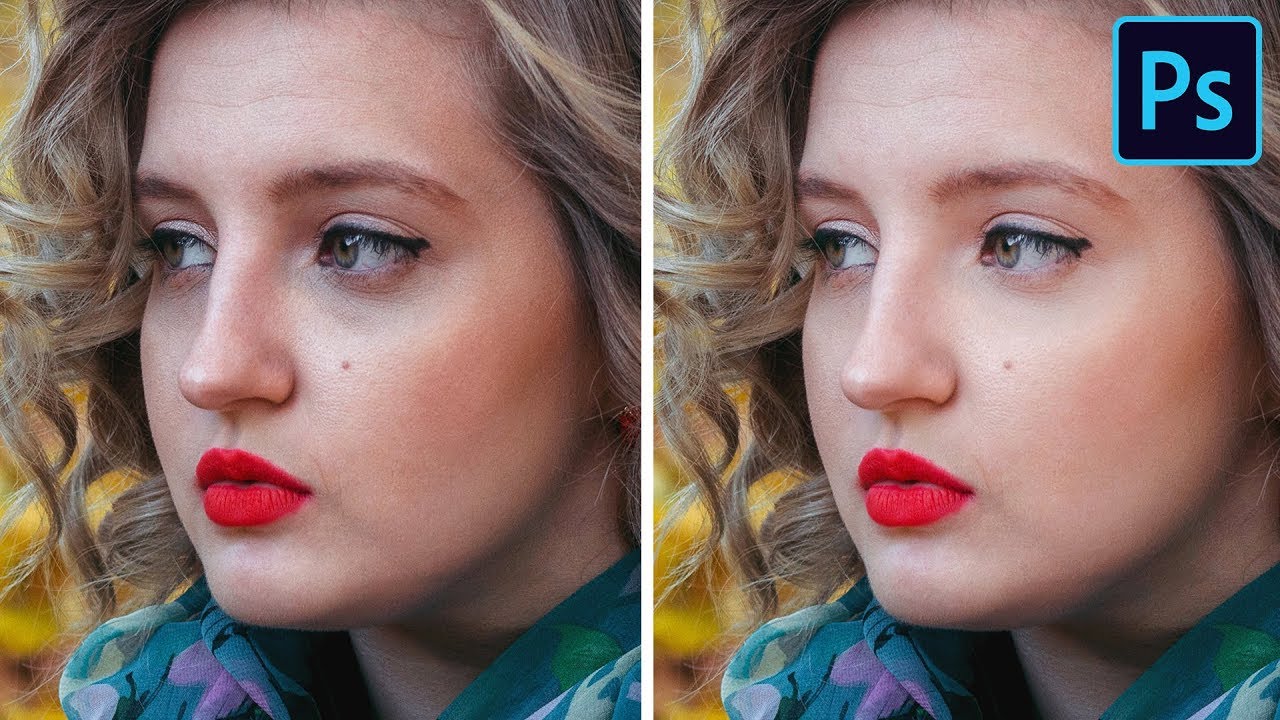
Today, we break down how to reduce dark circles around eyes in a photo.
**Download Sample Images Here:
Using our old friend Blend If, Adjustment Layers, and Layer Masks, you’ll learn how to target ONLY the parts of the skin that you want to make brighter. Then we’ll rescue some of the original skin color using a simple trick.
VISIT PHLEARN.COM FOR MORE FREE TUTORIALS
SUBSCRIBE NOW FOR MORE FREE TIPS AND TRICKS
LET’S BE FRIENDS!
Instagram ►
Facebook ►
Twitter ►
Google+ ►
Phlearn ►
Thank you man
can u please tell me which photoshop website are you using
Thank you! Very helpful.
Didn't really work for my picture for some unsure reason
Well done — thanks!
Photoshop download link ❤
Excellent Work.
Great video. Very easy to follow. A little more tricky for darker skins like myself but still worth watching.
you're the best guy on photoshop
Great tutorial, thank you very much! 🙂
Aaaaaamazing!
I love your videos ♥ you understand what the girls want lol
I love this Video!!!! You did a great job, and now I did a good Job on my photo. Thank you! Best wishes from Germany!!!
Stop SHOUTING!!!
Awesome! AND, you always make me smile!
Thank you very much I have dark circles and really appreciate the tip
Found your tutorials just the other day and I'm hooked! Thank you.
Would it be possible to do a tutorial on how to shoot jewellery on a model not in the studio (think blogger type/style street post) and edit it on photoshop so the jewellery really stands out?
i really love your work… <3
You are so funny and amazzzingg!! Love your work.
help plzz…..when i try using my brush after the invert colour …nothing changes..it remains same ?
AAAAAAAAMAZING! amazing 😉
Great video. I run into this issue a lot on portraits and almost always have to lighten the area under the eyes. I love the black and white tip and using the color blend mode to match skin tones. Simple and effective. Thank you!
You guys are awesome! Thanks for sharing so much valuable information.
Your tutorials is most important for me it clear my ideas…..Thank you phlearn
Very clear instruction, helped me out really well. Thank you so much! I had that one perfect picture but I was just sooo tired that night
I know more about Photoshop than anyone I know – and then along came you. It's EXCITING actually. I'm like a total beginner again. I can do all the things you do in about 5 times the time with more steps and less consistency. :^) But I'm phlearning.
Great tutorial, i wanna know did you add your logo watermark to the video
Awesome tips, as always guys.
so complicated. Are there any easier ways?
Hello Aaron, thanks for your tutorials, really fantastic. I'm going in left field with a PS question and hoping you can help.
After editing a picture in Camera Raw (all my pics open in CR) and I open it in PS, the saturation on the image automatically increases and for every image I have to go to Image>Adjustments>Hue/Saturation and lower the Saturation.
Is there something I've done to create this error ?
Thanks
Lacy Smith
lacysmith9545@att.net
Excellent
Wow! I love the tutorials like this. Doing something I never would have thought to seamlessly reduce the circles. Awesome! I will definitely be coming back to this tutorial next time I need to do this for a quick reference!
Hieee Aaron I really love your tutorials thank you for providing them i already loved Photoshop but because of you fell in Love with it again 😄😄😄😄. And I wish you could upload a tutorial on how to repair scanned images like all those noises & grains etc etc 😭😭😭😭 & how to save images without losing details/quality but it shouldn't take much space(file size should be less) ?
Awesome tutorial i love it so much
You really do an excellent job of explaining why you use a particular tool. You make learning fun also. Thanks.
Awesome bro
hi, a good tutorial as usual
I just created my photoshop channel if you want to see
Hi Aaron, Thank you for offering many interesting PS learning topics here. I have learned many skills from you from the past. This is the first time I am requesting a specific learning topic. That is “How to create very realistic skin texture for facial skin” . I have searched on YouTube. There are several different methods, some are good, some are bad. But I have not found a video that demonstrates a method matches those very high end retoucher’s work. If you don’t mind, would you like to offer this course for audiences to learn? Thank you.
When are you going to do a montage of all Aaron’s different haircuts over the years?
Hi Aaron! Can you let us know how to meter light properly? Thanks! 🙂
Awesome!
gràcies ets gran
Thanks I will try this. Ihave a question for you. I'm wanting to make some flyers for my church. What would be a pretty simple software to use.
Nice!
Video suggestion: "experience" the name we give our mistakes
What to learn from our mistakes and how to fix them.
Such as: I forgot to duplicate the initial layer, how take it in another file.
I want to go back in a downstairs layer and make changes that appear in the upper layers.
And what else does Aaron have to say about what he's learned from his own mistakes.
Thankful.
I've never seen this combo of techniques before. Most of these tutorials are just redoing every technique out there, but I think this was pretty unique
Sir can u plz make a vidoe on how to give miniature effects in Photoshop
Superb video. Cheers!
Cool video!!! I just warning on your network cable that probably will fail soon as was not crimped the right way =D
Fantastic!!! Thank you for sharing these steps!