Shoot Your Own Amazing Water Drop Photography
Squarespace – For a free trial and 10% of you first purchase go to –
Follow First Man Photography for the latest updates:
Buy water drop prints –
My Gear –
eBook –
Instagram –
See the other water drop photography videos –
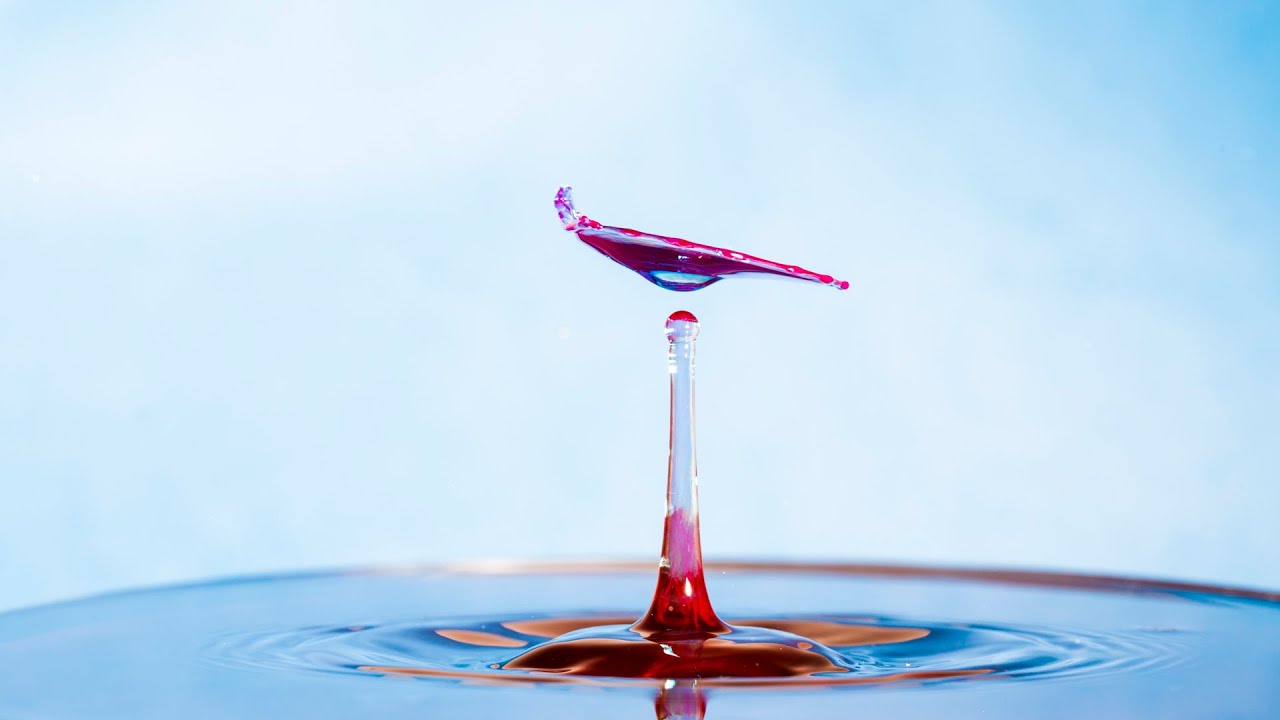
Welcome to the world of water drop photography. In this photography tutorial we show you how to capture water drops using a basic set up and a more complex setup using the SplashArt 2 dropper system.
I first started shooting water drop photography a few years ago when I noticed a few popping up on Flickr. It is an exciting area of macro photography and I was instantly struck by these amazing moments of nature that we see so often in our lives but never have the chance to study. Fascinated, I decided to see what it took to capture these images and I felt I could produce something original using my own lighting ideas and composition.
Having set up, using something very close to the basic setting featured in the video, my first capture of a water drop was extremely satisfying. I was instantly hooked. I quickly upgraded my equipment and bought the SplashArt 2 kit so I could produce and capture water drop collisions repeatedly. Once in the arsenal it left me more time to play with my lighting setup, composition and drop consistency. In water drop photography changing the consistency of the liquid has a direct result on the final image. Milk is slightly thicker so behaves differently and the different surface tension produces different looking drops. I eventually took this to an extreme adding Xanthan Gum to my liquid. This thickens and smooths the liquid to the point where the final drops have a crystal like appearance.
Understanding the theory of water drop photography is key to giving you the ability to fully explore the creative possibilities. Normally we freeze action by increasing shutter speed and this works perfectly in most conditions. However in water drop photography the action is frozen with the flash. When using flash to light a scene the shutter speed is limited by the flash sync speed of your camera. On most DSLR’s this limits you to about 1/200th or 1/250th second which is not quick enough to freeze a water drop. The flash burst is much faster than this so exposes the scene so quickly that it freezes the action. Further, Speedlite flash guns discharge their light faster at lower powers so the lower the power you can manage to use the better your image will be frozen.
After some experimentation I settled on using 1/32 flash power. The shutter speed does not really matter but I set it at 1/200 to avoid any ambient light sneaking into the image. Aperture needs to be as high as possible to ensure all the drop is in sharp focus but needs to be balanced with ISO to obtain a well exposed image that is not too noisy. The majority of my shots have used f/11 and an ISO of around 400.
Hopefully this will arm you with the skills and knowledge required to start shooting your own images. To move things on further you can add extra flash guns and multiple droppers to ensure that every image will be unique.
Great video. I am trying this as a school project. Do you remember what your flash settings were?
Great video I will do one day
Great video, i was able to set up and get decent shots within about an hour thanks to this. I'd be really interested in what kind of DIY techniques there are to create some more creative effects without investing in a drip kit.
Thanks for the great tutorial……simple and to the point. I used your method and had good results on the first day. It was a little tricky trying to time the droplet splash so I just did continuous shutter releases and obtained enough pictures to select from. 👍🏻👍🏻
I dont see the water drop device. Can you set a link please? I will like to purchase one. Thank you
Hey Adam, in case you haven't seen this… I reckon you'll like this.
https://youtu.be/FaKbpw4Ko8A
Really enjoyed that and going to give it a try. Heard you talking about it on the Photo Nerds Podcast and thought I would take a look.
My pictures won't get sharp… I focus manually were the drop impacts. My aperture is about 16 Iso 100 and shutter speed 1/10… I use the Canon eos 7d mark ii and the ef 100 2.8 macro lens…
HI I really enjoyed your video. One question which may sound silly… is your camera level with the water dish or is it higher? I would have loved to see a side on shot to see the angle at which your camera was placed. Thank you 😉
What size were your drops and what was the delay Between them
amazing bro keep up the good work…..
it helps me alot to learn as well……
I know this is an old video and not sure you'll see this comment, but I watched this again today and just had to go out and buy some food coloring and setup a drip bag. This was the most fun I've had in some time. Awesome! Thanks for all your videos.
Amazing job . Loved it
😎
👊🏻
Does a zoom lens 55mm-300mm works for that?
Very nice work good bit of education ta
Great tutorial, but I have one question. I have tried it by myself with my pluto trigger, but I always get a lot of splashes when the second drop collides with the first water drop. In your tutorials you always get a collision with no splashes.
Nice something I will try to make my self,
Really informative, great video really well explained, Appreciate your time. Subscribed !!!
someone's been to Morrisons !
Thank you so much for this video, you helped me with my homework assignment for college. Plus I love your landscape videos, I love landscape photography! I do have a question, if you use milk do you fill the bowl with milk as well or is the milk just from the dropper? Thanks 🙂
Great film cant wait to give it a try love close up work, wonder how corn flower drops would work. can i have a copy of your ebook in water drops?
can you share the link to purchase the drip kit with the controller or with the time machine…
I have Nikon d3200 with 18-200 mm lance but I can take water drop pic can you advice me how to do?
Thank you very much for producing this video. I want to set up a system in my college makerspace and this presentation was very helpful.
you said go out………….no need to go anywhere with this one…..thats winter evenings sorted
Can i only mix water and milk? Without xanthin gum
Get a bad of water and bite a small hole in it at the corner and fill the water so the camera can see it and Boom!
Awesome 👏 thanks 🙏 shout out from Portland Oregon
Over talking
Amazing..!!
Great
Hi,
When you focus in manual mode on the pen, don't you have to press the depth-of-fiel preview button to really geht the depth of field for the given aperture?
Best, R