In this tutorial you will learn how to create cool graduation slideshow with songs.
Don’t forget to check out our site for more free how-to videos!
– our feed
– join us on facebook
– our group in Google+
In this tutorial you will learn how to create cool graduation slideshow with songs. Graduation memories will stay with you and your classmates or coursemates for the years on, so you should strive to create the best graduation slideshow that you can.
Before you’re starting to create your slideshow, check if you have all pre-requisites: quality photos, good music and good mood. While choosing the music, think about something that you, your parents and maybe future children will enjoy hearing ten and twenty years from now. Choose the photos of your classmates you’ll be happy to remember.
Step 1. We will start with a small tip on finding good and free music. Since you will use the music for non-commercial purposes, our website pick might suit you very well. Visit websites like freemusicarchive.org and to find extra music for your graduation slideshow. Some acclaimed music artists like Moby (www.mobygratis.com) or Sigur Ros ( offer their music for non-commercial use as well! We will choose a track by “Sigur Ros” for our graduation slideshow.
Step 2. Now let’s create the slideshow. Open your iPhoto application.
Step 3. From the down right corner, click “Create”. A menu with options will appear.
Step 4. Choose “Slideshow” from all options available. Name your Slideshow.
Step 5. Now let’s import our photos. Click “File” and “Import to Library”. Import your photos from their location on your computer.
Step 6. Now we will add the imported photos to our slideshow. Select all the added photos with a mouse. From the down right corner choose “Add to” to add your photos to your newly created Slideshow.
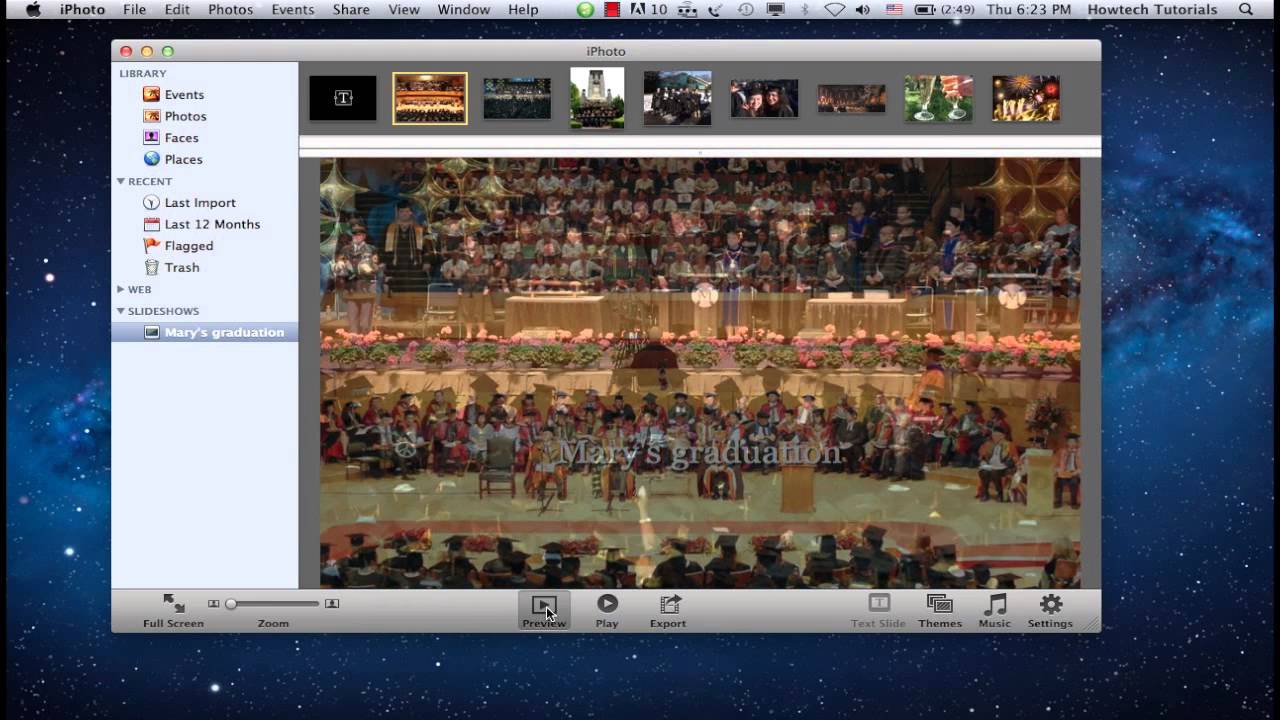
Step 7. Under “Slideshows”, click on your newly created Slideshow name. In the upper part of program interface you will be able to change the order of photos.
Step 8. Click “Play” to preview your Slideshow on full screen. Alternatively, if you don’t want to go full screen, you can click “Preview”. Are you satisfied with your picture sequence?
Step 9. Now let’s add music to it. Click “Music” button from the down right corner. We will choose iTunes as our music source. Select the desired music file and click “Choose”. Your music track is added to the slideshow.
Step 10. Click “Play” or “Preview” again to see and hear your slideshow with music. Everything looks good! We’re done with the slideshow creation.
Step 11. Click “Export” button to export you slideshow in desired format and size. Click “Export” when you’re done with choosing export file options. Choose the exported file location on your computer. That’s it! Your exported file is ready in a couple of minutes.
Result: Congratulations! You have just learned how to a cool graduation slideshow with music!
does not work @ all
I don't have 'create' bottom right in iphoto….
dOESN'T WORK! SHIT FUCK YOU ! 🙂