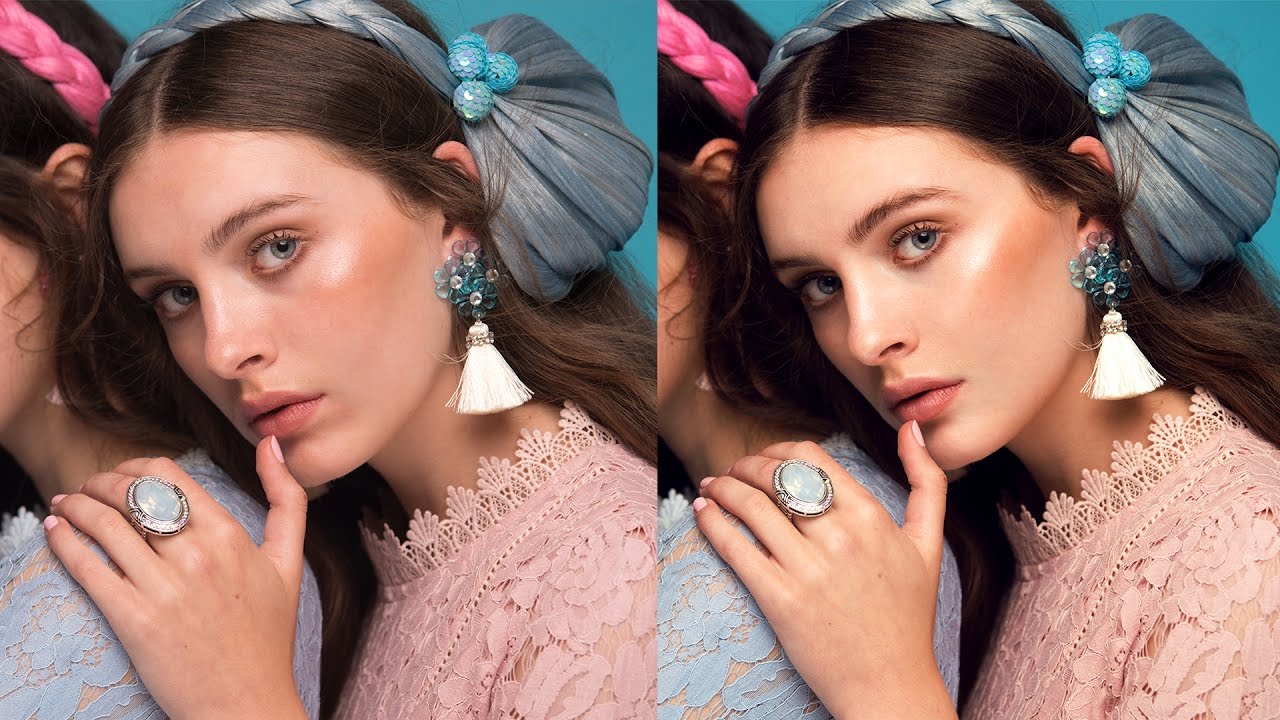
This is my updated photoshop Dodge and Burn tutorial that can be used in fashion photography, portrait photo retouching. It make skin retouching nice and easy. This is my updated tutorial video as I felt that my previous one I did not explain things properly.
Check out my Lightroom Preset Packs ( USE CODE – youtube10 ) –
Songs I used:
-~-~~-~~~-~~-~-
Please Subscribe for more videos –
I would love to hear what would you like to see next – if you have any suggestions comment below!
Instagram:
Facebook:
Website:
Snapchat: sadowskaphoto
What Gear do I use?
My Big Camera –
Big Lens –
Second Lens –
Memory Cards –
Lighting Gear –
What Video Gear do we use?
Big Camera –
Camera Cage –
Main Lens –
Second Lens –
Memory Cards –
Sound Recording –
Microphone –
About Me: My name is Anita Sadowska, Im a 24 year old professional fashion photographer based in Dublin, Ireland. On my channel I will be uploading regular photography tips & tricks, Fashion shoot behind the scenes and loads of photoshop and lightroom retouching and editing tutorials.
Is it overkill to use Frequency Separation on the skin as well or is it just a preference to use either or?
Very nice system
I prefer your method over frequency separation thank you so much for this video.
The face as plastic has become, moreover, the relief is lost and the effect of presence has decreased. Dislike!
it was truly awesome , thank you
I love you. For showing us the true method with grey layer without FS. Thanks a ton. Give us more tutorial on textures, global dodge n burn and local adjustments. Thanks thanks thanks
Your talant!
This is literally one of the best photo editing tutorials out there!!! I love it!
Thank you Anita!
i dont know english language, but i am say your tutorial is very easy and excellent, i easy understand for your tutorial.
I love these tutorials!! Seeing your work flow is such a huge help when editing and practicing with my own photos.
Thanks for the tips very informative
You're so down to earth – pleasure to watch you and listen to you. And thanks for a very informative and good tutorial!
Borze szumiący, zawsze jestem TAKA DUMNA, gdy znajduje tak zajebiste kanały i okazuje się, że należą one do Polaków!💕
wow now i know how to use dodge and burn usualy just add some presets but im glad i learned something new today
Hello, congrats… Very efficient post… Thank you for sharing this :o)
I could never get this to click, as to when to do it and where. I've watched countless videos from Lynda to facebook groups…and this is the only video that I understood what and more importantly where I am supposed to use this tool. Thank you so much! My work is already on the next level just from this simple video.
Wow! Thanks! Looks like a Christian Dior photo .
Thank you 🙂
I love your video so much,its so helpfull.keep up the goodwork!😉
Thank you.
Hi Anita, I saw the dodging but not the burning. You coloured over the highlights but never brought out the shadows, or am I missing something. Thanks in advance very good video
I know it's an old tutorial but I will post a question on the off chance that you read old videos' posts. I see that you lighten the highlights on the chick and darken the eyebrows at the same time. Did you do it on the same layer (layer 1), or did you switch from "Layer 1" to "dodge&burn" layer when darkening the eyebrows? Thank you, great work.
awesome!
I am so inspired! Thank you so much Anita, it was a logical, clear and constructive tutorial. keep it up!!
and how to go from highlighting to shadowing?
Thank you for sharing this tutorial! It really helped me understand the procedure.
I got one question.. When I was brushing the whites over the dark eye bags ( and because they are very dark I have to go over again a few times ) it looks very yellowish / glowy? How do I prevent this ?
This is the best tutorial!!!! Learned so much 🙂
You're fantastic in retouching. Though I would love to see a retouch video of some really really bad skin. Like 16 year old skin full of puberty. Would it be possible to get that to this level?
you are an amazing teacher FYI ! been watching a lot of people but you know exactly what you are doing!
thanks ani
Awesome! Thank you so much.
Dziekuję. Próbuję kombinować z różnymi technikami retuszu skóry. Twój mi się podoba. Czy masz jakiś sposób na stonowanie świecącej skóry na czole i nosie?
You don’t use a graphic tablet?
Wow Anita, Im amazed that you did that with a track pad.. very articulate with those fingers!!
The best channel on youtube.
Great chanel !!! I feel very motivated because of you :))dziękuje <3
Thank you ! Very Amazing video and your channel is very fashion!! Hallo from Germany
Ok there is something i am not getting, you created a layer and called it D and B, then used a white brush, then you created another layer , same options, used a white brush but called it Highlights and shadows….so when you paint on both you are adding dodging /highlighting basically?? the two layers are the exact same. what am i missing here?I do not see you burning/darkening, only dodging/brightening….so why 2 layers same options.? thanks
Great work , very helpful for beginners , one's again thanks alot 😉
i followed your steps, and the dark areas around the eyes/skin that i brushed over became more white and did not match the rest of the face color. what am i doing wrong? the photo was taken outdoors on a sunny day if that makes a difference… Thank you for your time
You are beautiful and amazing thank you. x
Great video thank you I feel more confident now dodging and burning
Hi dear! I love your videos and this is really the best one regarding dodge and burn. Thanks a lot for sharing! Could you do a tutorial please how to achieve this dark and glossy skin tone like on Vivaluxury blog? Somehow it ends up to look not very clean when I try. Thanks so much!
Thank you so much Anita! This is def going in my saved files. I love how clearly you explained it and I love the black and white layer to guide you as a beginner. I've been a big Lightroom only users for a long
Time and only using dodge and burn tools in photoshop. This creating a layer thing helps a lot more in not making it so intense!
Just curious, why did you makes a dodge and burn layer then you did a highlights and shadow one instead of combining them all together?
Also I found when I did it, it made it too soft looking as well. Do you end up doing s sharpen tool after sometimes?
Thanks again!
Excellent… simple & subtle approach 🙂
thanks for a detailed video, but i think you should have mentioned clearly when you switch from white brush to black brush to ease understanding newbies like me. You can still do this i think in youtube annotations perhaps.
Hi Anita, your work is amazing. May I ask what strobe lights you use for your photography? And any brand you may recommend? Also what watts you would recommend for fashion photography. Thanks so much, I'm so inspired by your work!
You are a great find!! Thanks for this. You brought my work to another level.
thats absolutely helpful but what about skin final rotouch or filter ?? i went with all the steps and i did right but my skin still not soften or filtered