Essential items:
Camera:
Softbox Lighting:
Polarizing Filters for the lights:
Here’s my method of photographing my art. Rather than spending $100 per painting, I prefer to do it myself and ensure I’m getting the same quality as the pro’s offer.
Let me know how it works for you and if you have any suggestions to add.
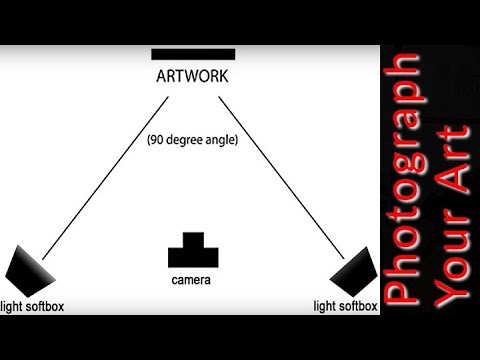
I am a professional artist and often must photograph my art for updating my portfolio. Here I show you how I go about doing this. I am photographing an oil painting, 36×24 inches, painted in very dark colors which can be the most difficult to photograph due to the excessive glares.
In this video, I’m using a Canon DSLR ( )
which allows me a lot of control rather than point-and-shoot with your phone.
I use soft box lights (these are the affordable sort)
While they work for most things, they do still put out a bright white light that does create glare. After I photograph the painting, I will be using Adobe Photoshop to smooth out the glares. I will share how I do this in another video soon.
The painting is available for sale (at the time of this posting: June 10th, 2013) through Matt Abraxas studio (
The music is royalty-free and purchased from Videoblock.com
Trick:
Take two separate photographs,
each with one light on either side. So half the painting wont have glare. Then in post
layer them together and erase the side with the glare.
I don't have polarization filters or diffused lights.
But will for my next project.
U can add more skrimming to your lights if there is too much glare when you dont have the room to back your lighting up. U can even use flags to cast shadow to soften the light as well.
Yeah, next video… need to explain what lens for minimal distortion and use a bloody polarizer for the glare.
Dat ass.
we actually scan large art that is up to 48" x 70" in size using this new scanner http://www.pennyimaging.com/
I'm so frustrated; no matter what I do, I get terrible glare on my paintings! I have two lights with diffuser covers just like yours, I set them at 45 degrees, I place them equal to my camera, I move them in front of the camera, I move them behind the camera, I widen the angle, I narrow the angle, I use a polarizing filter. Nothing I do seems to prevent glare on the paintings. Ugh.
Use a polarization filter to further reduce your glare on original photo. Use a color card to create a custom profile to compensate for the filter. You can also get 2 sheets of 4×8 foamcore to make giant reflectors to point your softboxes at to bounce the light back on the painting. Cut formcore in half vertically & make duct tape hinges so they will be free standing. This will double the distance of your light set up in a small area. Beautiful piece and you're on the right track by not varnishing first & lowest ISO setting for fine detail. The f-stop for each lens is different for the sharpest settings. They can range from f4 to f8 depends on your lens. I hope this helps…
Awesome painting! In addition to lighting at 45 degrees, I've found that photographing in a dark room with as few as possible reflective surfaces also helps reduce glare. I've heard it's even better to put something light-absorbing behind and on the two sides of the painting, perpendicular to it, so that you're forming sort of a dark box. A good light absorbing material is dark velvet. I haven't yet tried this however.
Just add more filter on lights.Same as moving them back.
A couple of things you could try would be white reflector panels above and below your painting. Use these instead of overhead lighting. Less chance of glare or "shine" on your painting. Secondly use a longer lens as this gives less optical distortion.
It would have been nice to include the finished photo at the end of the video so we can see how it came out.
You promised to show how to remove glare in photoshop, but you didn't.
Thanks for
the video and info. Great job and content! I'm just getting started in all this
with my etsy
shop selling magic wands but would love to do this for my first passion, my
art. So, much appreciated!
Warm regards,
Craig
http://www.spadewands.com
http://www.thewandmakerssecret.etsy.com
hi man..my name is Ben albergo lario is just the name my hotel…ahah..just a suggestion…to set up the white balance….less work in post prod!!!!!
metering?
Wonderful video and I LOVE your painting. I actually had a question about the painting. I just finished up a painting on a black canvas (my first) Should I paint the black areas black, or leave the black of the canvas there?
HI, why dont you use a goo polarized filter that allows you to remove glare from the beginning and gives you more color contrast?
This is great man; do you know how to add a background to your painting and how to put shadows for better quality? Thanks
Do you have the other video posted of the photoshop post edit? Thanks!
I shoot paintings and other 2D surfaces in the studio with almost the same set-up. I use a Canon EOS 5D Mark III with a 100mm Macro EF f/2.8 and a EF 50mm 1.8. Usually set at f/18 to f/22 in Av mode. I usually live in 200 iso. I think it is very important to utilize cross polarization filters in the shoot instead of relying totally on post-production touch ups. Thanks for sharing your techniques! Awesome painting by the way : )