Photoshop Elements Art | Create Glowing Light Streaks Photo Manipulation 2018 15 14 13 12 Tutorial
► Get my Complete Training Courses Online
► Get my Complete Training Courses on DVD – Amazon
The BEST way to learn Photoshop Elements is with my complete training courses along with my YouTube projects. It is the perfect learning system.
________________________________________________
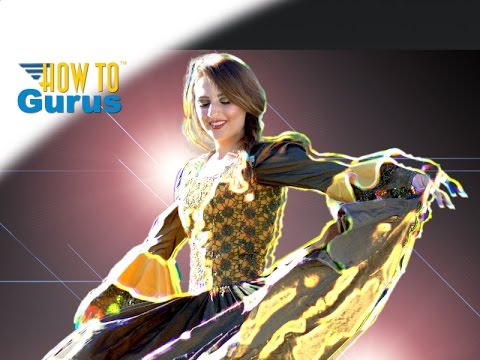
How to add excitement with glowing lights for art photography manipulation in Adobe Photoshop Elements.
Download Project Files here
This special Photo Manipulation video uses Layers and Layer Mask techniques along with some special filter settings, Blend Mode, and Lens Flare to create the glowing look.
This comprehensive tutorial takes you step-by-step through the complete process from beginning images clear through to the final composite image. This training tutorial was recorded in Adobe Photoshop Elements 13 but the techniques used will work just as well in Adobe Photoshop Elements 11 through the latest Adobe Photoshop Elements.
________________________________________________________________
This is just one of my numerous How To Adobe Photoshop Elements online tutorials. You can view more Adobe Photoshop Elements tutorials in these YouTube Playlists:
Adobe Photoshop Elements Essentials
Adobe Photoshop Elements Holidays
Adobe Photoshop Elements Photo Retouching
________________________________________________________________
“Like” this tutorial video by clicking on the thumbs up.
Click the Share link and share this video with your friends on Facebook, Twitter, Google+, and other social networks.
Don’t forget to Subscribe to my YouTube Channel
Follow Me:
Facebook:
Twitter:
Pinterest:
video and description copyright 2016 George Peirson all rights reserved
-~-~~-~~~-~~-~-
Please watch: “Photoshop Effects Background Change – Photoshop CC 2019 Manipulation Photo Effects Tutorial”
-~-~~-~~~-~~-~-
What a fantastic video!!! Lots of fun using all the different tools in this creative gem!
20 layers, the most so far. And many lessons, some few of which are:
1. Watch George's cursor like a hawk; where it goes, you go;
2.Make sure all your settings are the same as his.
3. Before you perform an action, make sure you're on the right layer, and that you have the same layers as George, and that they're in the same order; if not, figure out why before going on;
4. Don't bite off more steps than your memory can chew. When George does something, you do it, step for step.
This seemingly takes more time, but it takes less time in the end.
I formulated these rules after this tutorial didn't come out right, and I had to do it all over—twice.
I learned a lot with this one, a few too many the hard way. And why shouldn't I have? I had two expert teachers: George and the School of Hard Knocks, the latter of which (take my word for it) is harder to get into than Fort Knox.
Great lessons, George. keep it up.
A great demo, George!
George, what a creative mind you have!!! I have tried on many occasions different effects but really did not understand the purpose of them. This is really a great video showing what is possible. I can think of many applications where a person would want to use this kind of effect. Thank you again for taking the time to help educate us on these!
You are much appreciated!
Rich
like